UEFI Ninja
As Wikipedia and its own Forum says, UEFI (Unified Extensible Firmware Interface) is a software layer situated between the operating system and platform firmware. It was developed as a replacement for the BIOS and provides an environment where developers can create applications and drivers for use before the operating system is loaded. UEFI is defined as a specification with a corresponding reference implementation named Tianocore.
In order to better understand another target I am reversing it became clear that I needed to learn more about UEFI and reverse some aspects of it. This blog post discusses some of the basics of UEFI and tools available.
A Crash Course in UEFI
As mentioned previously, UEFI is intended to replace the BIOS as well as provide an environment for developers to create pre-OS applications and drivers. The UEFI specification borrows heavily from concepts and constructs present in the Microsoft Windows environment; for example, UEFI binaries are very closely related to Microsoft’s PE-32/64 binary format. UEFI is natively capable of reading from devices, such as hard drives and flash drives, partitioned using the GPT scheme. The first partition on the device is referred to as the EFI System Partition (ESP) and may contain almost anything. Typically the ESP is where you’ll find an OS loader but you may also find other assets such as firmware images, configuration files, and custom UEFI applications. The UEFI specification states that the ESP should be formatted as a FAT-32 partition.
From a developers perspective, UEFI manifests itself as a C API designed around tables. This is a large, and much appreciated, departure from the interrupt driven programming interface used by BIOS. Vendors (operating system, hardware, or platform) may also expose functionality in addition to that provided by UEFI through a protocol-interface paradigm. Through this paradigm, vendors are able to use the same set of custom interfaces from all of their applications since the protocols are defined in a global namespace. Another point of note is that UEFI may expose services during boot, at runtime, or both.
My target for this work is a MacBook Pro with TouchBar. I plan to cover that work in a future blog post but for now suffice it to say that I was interested in better understanding what happens before macOS is executed hence the need to investigate UEFI.
Working With UEFI Firmware
The first step to working with UEFI firmware is to get the firmware (obvious, I know). Apple has been nice to us by leaving a copy on the ESP under the path EFI/APPLE/FIRMWARE (e.g. the firmware for an iMac is located at EFI/APPLE/FIRMWARE/IM171_0110_B00.fd). Alternatively, @osxreverser maintains a repository of firmware images on Github. Like other vendors, Apple tends to use two file extensions for UEFI firmware: .fd (Flash Descriptor) which contains a Firmware Volume (FVM), and .scap (Signed Capsule) which contains a Firmware Capsule. The Firmware Volume contains a complete image while the Firmware Capsule contains incremental updates. We are primarily interested in the Firmware Volume at this time.
In order to extract the FVM there are two open source options:
- UEFITool by LongSoft, and
- uefi-firmware-parser by theopolis.
The major difference between the two tools is that UEFITool is a Windows application with a GUI application for exploring the firmware image (see Update 1 below) where as uefi-firmware-parser is written in Python and exposes both a programming interface in addition to a command line. After trying both I ended up using the latter since it allowed me to extract individual files from the FVM easier. The listing below shows an excerpt of the output when you run uefi-firmware-parser.
ironman@ubuntu:Work$ uefi-firmware-parser binaries/MBP133_0233_B00.fd
Flash Descriptor (Intel PCH) chips 0x00, regions 0x00, masters 0x02, PCH straps 0x58, PROC straps 0x03, ICC entries 0x00
  Flash Region type= bios, size= 0x6c9000 (7114752 bytes) details[ read: 0xaf, write: 0x01, base: 0x137, limit: 0x7ff, id: 0xff00 ]
    Firmware Volume: fff12b8d-7696-4c8b-a985-2747075b4f50 attr 0xffff8eff, rev 1, cksum 0x6a22, size 0x30000 (196608 bytes)
      Firmware Volume Blocks: (2, 0x10000)(16, 0x1000)
      Raw section: NVRAM
      Raw section: NVRAM
    Firmware Volume: 8c8ce578-8a3d-4f1c-9935-896185c32dd3 attr 0x00047eff, rev 2, cksum 0xf503, size 0x157000 (1404928 bytes)
      Firmware Volume Blocks: (343, 0x1000)
      File 0: ffffffff-ffff-ffff-ffff-ffffffffffff type 0xf0, attr 0x00, state 0x07, size 0x2c (44 bytes), (ffs padding)
      File 1: 5e7be016-33cf-2d42-8758-c69fa5cdbb2f type 0x02, attr 0x00, state 0x07, size 0x5b78 (23416 bytes), (freeform)
        Section 0: type 0x19, size 0x5b60 (23392 bytes) (Raw section)

...
As shown, the FVM is a hierarchical structure which may contain additional Firmware Volumes, Firmware File Systems (FFS), and files. Also note that objects in the FVM are identified using GUIDs, this approach is quite pervasive in UEFI. Although not shown in the listing above, some files do contain names in their metadata which uefi-firmware-parser will display, some of the Apple-specific names found are:
AppleDebugSupportDxeAppleUpdateMTRRAppleBdsAppleSmcApplePlatformInitDxeAppleBootUI
Of note are AppleDebugSupportDxe and ApplePlatformInitDxe which, based on the name, would be executed in UEFI’s Driver eXecution Environment (DXE) as well as AppleBds which, again based on name, would be loaded during Boot Device Selection (BDS). The Tianocore wiki has a an article describing the various stages of platform initialization in UEFI.
In order to identify “interesting” binaries in the extracted FVM your two primary options are to use the names just discussed as a guide or search for strings in the binaries. When it comes to string searches it is important to keep in mind that strings are UTF-16 encoded by default and you will need to account for that. Unfortunately, the ubiquitous strings command does not display UTF-16 encoded strings by default and, even more unfortunately, the switch to turn this functionality on varies across implementations. On Ubuntu you can specify the -e l flag; however, on macOS you’re left with trying to convert the UTF-16 strings into UTF-8 using iconv then searching those.
UEFI Images
At this point lets assume that you’ve identified a binary of interest and its time to start looking at it closer. For this post, I will be using the file named AppleSmc with UUID db8af09a-34e3-4a7b-8225-8c5b0c059eb8.
Before we go any further lets first take a detour to talk about calling conventions. As we already know, UEFI applications are based on Microsoft’s PE file format and they may be either 32-bit or 64-bit depending on the hardware. Since Apple’s hardware is 64-bit we will focus on that. The calling convention used by PE64 binaries is the Microsoft 64-bit calling convention. In it the first four integer values are passed in the registers RCX, RDX, R8, and R9. Additional integer values are passed on the stack. This calling convention also makes use of a “shadow stack” where space is allocated to store function parameters (see this page on stack allocation) regardless of the number of parameters passed.
UEFI applications take two parameters to their entry function. The first is the image handle and is of type EFI_HANDLE; the second is a pointer to the system table and is of type EFI_SYSTEM_TABLE. The image handle is used mostly as a means of referring to this image when registering protocols and performing other actions. The system table, arguably the more important and useful parameter, contains pointers the boot services table, the runtime services table, and various configuration tables among other things. The UEFI 2.7 specification devotes Chapter 4 entirely to defining the system table.
Opening our binary in IDA we are quickly greeted with the disassembly of the image entry point. In order to get the markup shown below you need to first add three structures to your IDB:
EFI_SYSTEM_TABLEEFI_BOOT_SERVICESEFI_GUID
After that has been completed you can then mark various offsets as needed.
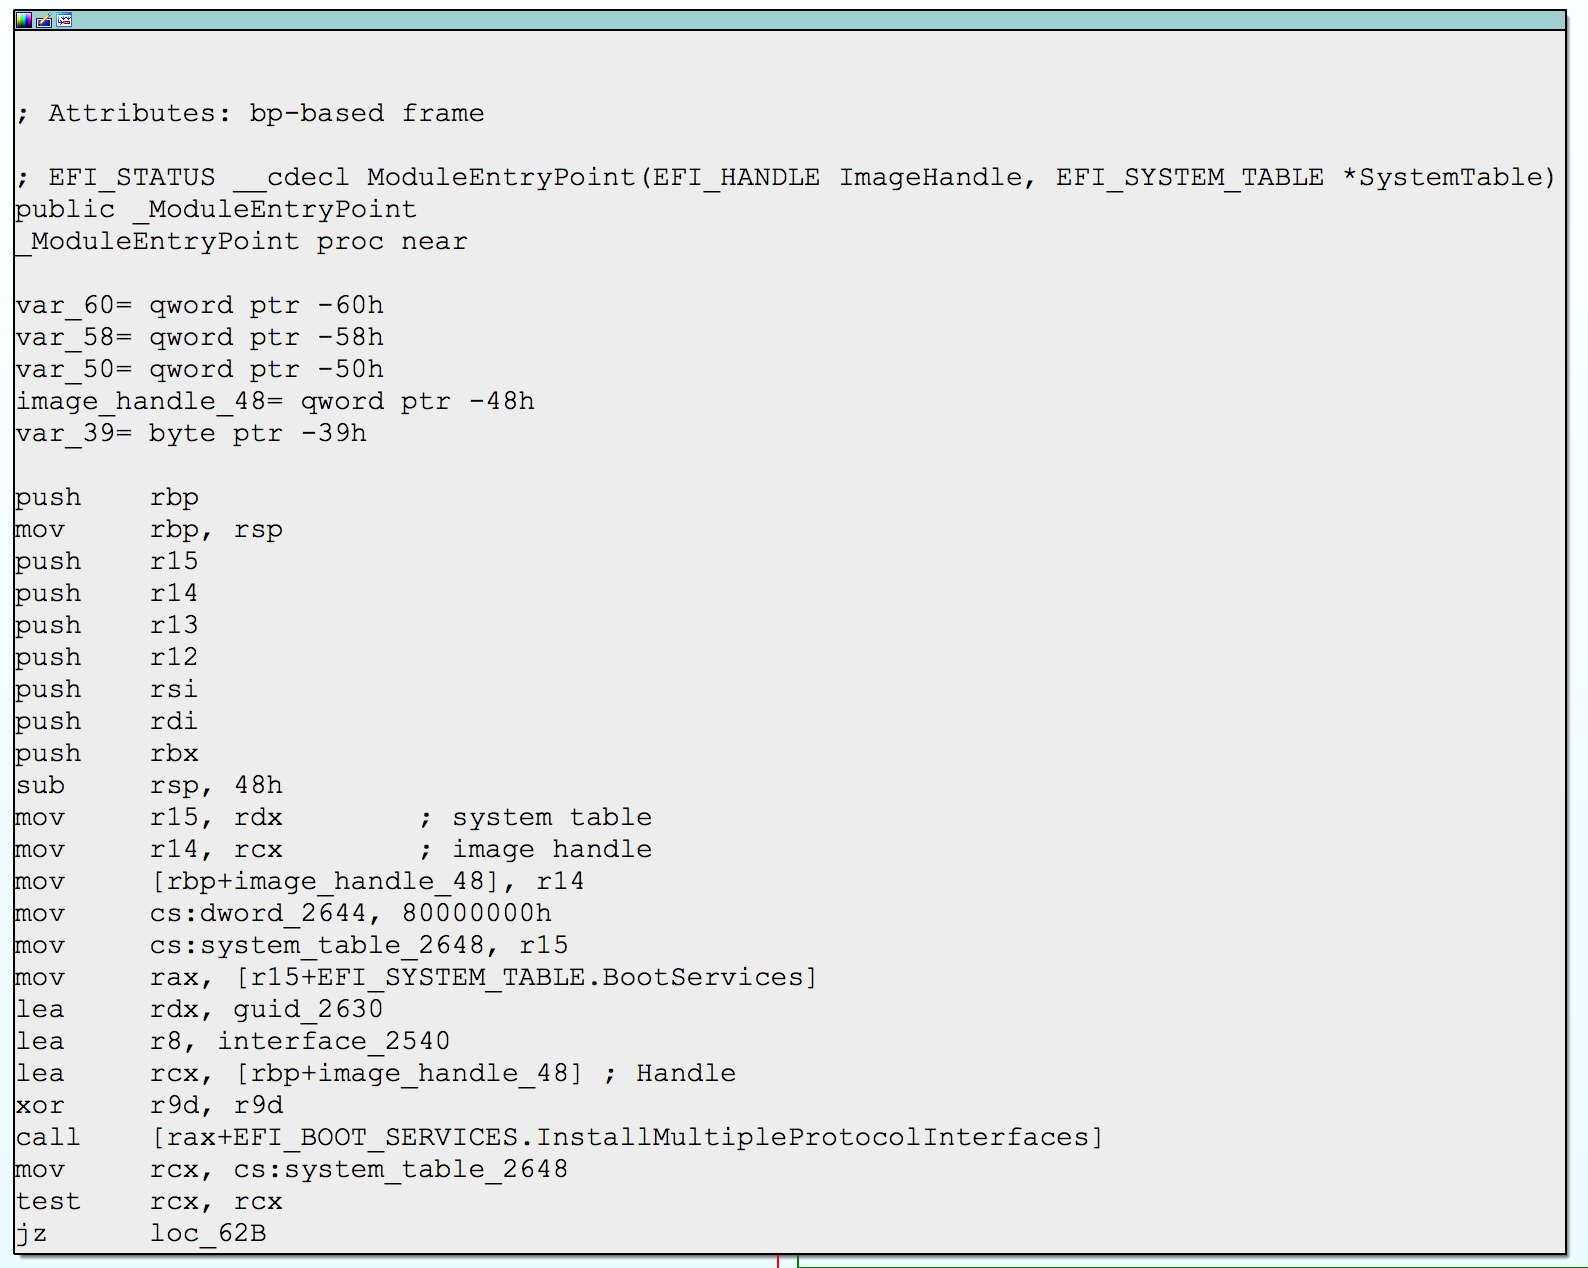
Marked up UEFI image entry in IDA
While this is a small screenshot it serves to demonstrate the markup that can be achieved using built-in structures and features.
The Protocol-Interface Paradigm
One of the pain points when it comes to reversing UEFI images is that everything uses GUIDs. On top of this, developers can install protocols in a global namespace. The fallout of this is that a protocol defined in one image can be used in another image which has the benefit of minimizing code duplication as well as separation of functionality; however, from the perspective of a reverse engineer it makes finding code incredibly tedious.
A developer wishing to register a new interface has two options through the boot services table:
- call
BootServices.InstallProtocolInterface(...) - call
BootServices.InstallMultipleProtocolInterfaces(...)
The only difference between these two functions is that InstallMultipleProtocolInterfaces(...) can register multiple interfaces while InstallProtocolInterface(...) can only register one.
When it comes to getting a pointer to an interface, the developer can call BootServices.LocateProtocol(...).
The UEFI specification defines some protocol GUIDs which can be found in the specification itself or in open source implementations such as Tianocore’s EDK2. Additionally, vendors may define their own protocol GUIDs for use by their developers. For a reverse engineer these vendor specific protocols are usually more interesting than the platform defined protocols.
Binary Ninja: Our Saviour
Up until this point we have largely been focused on details about UEFI and its implementation. Now our focus shifts to solving the problem of locating protocols implemented somewhere in the Firmware Volume (FVM). When reversing, I tend to do a lot of my manual analysis work in IDA. However, IDA isn’t all that great for automating the analysis of large numbers of binaries due to its limited API. On the other hand, Binary Ninja is great for this–it provides an API that exposes several intermediate languages as well as a selection of analysis approaches. On top of that if you have an appropriate license you can do all of this in “headless” mode without use of the GUI. The code discussed in this section is available on my Github.
The first step in locating the implementation of a protocol is to find the GUID. If your reversing in IDA (or any other dissembler for that matter) you’ll likely eventually come across an indirect call that you want to understand. Trace the register used in the indirect call backwards and eventually you should come to call to BootServices.LocateProtocol(...) which will have the protocol GUID as an argument. Note that GUIDs are not normally encoded as strings in UEFI images so keep in mind you’re not looking for a string, you want the bytes representing the GUID. Once you have the GUID the next step is to figure out where it was registered/installed keeping in mind that this may have taken place in a completely different binary.
Locating Protocol Install Locations
To locate the protocol implementation we need to find the location of the call to either BootServices.InstallProtocolInterface(...) or BootServices.InstallMultipleProtocolInterfaces(...) that installed it. Since the UEFI image is given a pointer to the EFI_SYSTEM_TABLE we can look up the offset to the boot services table in that and then the offsets of each function in the boot services table. The offset of InstallProtocolInterface(...) is 0x80 and the offset to InstallMultipleProtocolInterfaces(...) is 0x148. Both offsets are taken from IDAs structure definition. In Binary Ninja this now becomes an exercise in searching binaries for calls to either function and then inspecting the arguments passed to the call.
My approach to finding these calls roughly breaks down to the following pseudocode.
function find_calls(candidate):
    found_calls <- list()
    image <- open_binary(candidate)
    foreach function in image:
        foreach instruction in function:
            if is_register_relative_call(instruction):
                if register_offset is 0x80 or register_offset is 0x148:
                    found_calls.append(call)
    return found_calls
In terms of concrete implementation, the algorithm is implemented using Binary Ninja’s API and is contained the uefininja module. A few points of interest about this code and the Binary Ninja API:
- The Binary Ninja method
BinaryView.update_analysis()call on its own is not enough to find all functions in a candidate binary. This is because the default analysis (I believe) is built using recursive-decent from the binaries entry point. To identify additional functions not found using recursive decent you must also call the methodBinaryView.add_analysis_option("linearsweep"). - The Binary Ninja API exposes both a low level (LLIL) and medium level (MLIL) intermediate language as well as the “raw” assembly instructions themselves. We need to use (at least) the LLIL as it has been processed by Binary Ninja and provides additional features needed later.
- The LLIL is presented as a tree structure. In our case we’re looking for a path that matches the tree shown below.
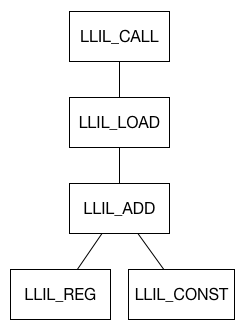
Tree structure of LLIL to identify a candidate call site
Matching the GUID
At this point we have located a call site that installs at least one protocol. We now need to check all protocol GUIDs installed for a match with our desired GUID. To do this we leverage a feature of Binary Ninja that uses (I believe, Vector 35 folks correct me if I’m wrong!) a combination of data flow analysis and symbolic execution value-set analysis (see Update 2 below) to get the value of a register in a given instruction. Since Binary Ninja also provides the ability to read memory in the analyzed binary through its API we can then take the value in the register and find what it points to in memory. Finally, we compare that result with our desired GUID. Putting this all together it looks like the following piece of code.
reg = 'rdx'                         # actual register depends on which
                                    # call and parameter we're looking at
mrv = instruction.get_reg_val(reg)  # get_reg_value() may return None
val = mrv.value                     # remember, mrv may be None should check for that
mem = BinaryView.read(val, 16)      # read 16 bytes from address in val
If all went well, we should have a GUID in mem which can then be compared against our desired GUID.
In the case of BootServices.InstallProtocolInterface(...) this is all somewhat easy since all values are passed in registers and there is no need to also search for a trailing NULL argument to locate the end of the parameters as in BootServices.InstallMultipleProtocolInterfaces(...). Another point to note, the Binary Ninja API exposes several “get register value”-style methods, in my experience I found that only the variant on the LLIL instruction worked as expected.
Wrap Up
:Despite a few quirks, by far this was the first case I found Binary Ninja to really shine. Up until now I mostly found myself comparing it to IDA in terms of manual analysis when in fact it performs way better as an automated analysis framework. When it comes to UEFI, the learning curve is steep and the software complex. So far it is unclear to me if the tradeoff in complexity is worth the ease of not using the interrupt-driven programming model found in BIOS.
Update 1: A few readers pointed out I incorrectly stated that UEFITool is Windows only. UEFITool built with Qt and supports any platform that Qt itself does; my reasons for stating that it is Windows only is because I only found Windows pre-built binaries. I have since built it for macOS and can confirm the hardest part is installing Qt. Also, the author of UEFITool pointed out that UEFIExtract (part of the UEFITool suite) can dump binaries from the UEFI image.
Update 2: Vector 35 reached out to me with a correction. They do not use symbolic execution to compute the value of a register; to do this Binary Ninja uses an approach known as value-set analysis. There is a great post on the Binary Ninja blog that discusses value-set analysis in the context of function detection.